Friday, January 25, 2013

Burial Pants - Free Pattern


Hello again!

Today I have something a little different. Being in so many groups and forums with parents of angel babies I often hear the phrase "I wish I had..." This pattern came from one such comment. "I wish I had pants for my little boy, it was a little uncomfortable for my partner to place his son in a "dress""

Ok so me personally, I don't think this would be an issue, but I can certainty understand people wanting to place their dear little man in a pair of pants. The problem however comes with the fact that small babies are so very hard to dress and moving their limbs about can cause problems. I gave this a lot of thought before designing these pants and I think they should work well. The first feature is they have an opening in the back, so there is plenty of room to slide the waistband of the pants over bubs legs and onto their body. The second feature is fully open legs with button closures, eliminating the need to get fragile legs to go into pant legs. All you need to do is close the buttons around the ankles and the pants will have legs. Obviously there would need to be a diaper underneath as the crotch area doesn't close (tho, you could add another button or a tie, but it could be a little fiddly to get it done up) All in all I think this is a great start to more items for the little boys who often miss out when it comes to clothing. These pants will fit from 24-28 weeks gestation because of their button waist makes them very adjustable. If you make them larger, make the legs a few rows longer.

Burial Pants

DK weight (8ply) yarn
4mm Hook
3 small buttons

ch35
1. hdc in the 2nd chain from hook and each across (34)
2. ch2, turn, hdc in each stitch across (34)
3-4. Repeat row 2 (34)
5. ch2, turn, hdc in each stitch across, join with a slst to the ch2. You have created the waistband. (34)
6. ch2, hdc in each stitch around, join. (34)
7. Repeat row 6.
Starting a leg.
8. ch2, hdc in the next 17 stitches (17)
9. ch2, turn, 2hdc in the first stitch, hdc in the next 15 stitches, 2hdc in the last stitch (19)
10. ch2, turn, hdc in each stitch around (19)
11-16. Repeat row 10.
End off. One leg complete.


With the pants upside down and the split in the wristband to the back (facing away from you) join the yarn with a sl st to the next unworked stitch.

1. ch2, hdc in the same stitch and in the next 16 stitches (17)
Repeat rows 9-16 to complete this leg.
Do not end off yarn.
dc evenly up the side of the pants, to the crotch and down the other side (the front V of the pants) When you reach the hem of the pants slst in the corner and end off.
Join the yarn to the corner of the hem on the back of the pants (on the V area) and dc around this one as well. End off and weave in all ends.


Sew buttons on the bottom of pants legs (on the corner), and also one on the back of the pants to close the waistband,


Pattern 4/52 for 2013
Images copyright Myshelle Cole, please do not use without permission.

Monday, January 14, 2013

Cerys Booties - Free Pattern


Hello again :D

I know, It hasn't been a week yet since my last pattern. I had a change of plans :) Instead of aiming for one a week/52 in total, Im just going to aim for 52 for the year. If I make it before the end of the year thats great, Ill just add more :)
I know people are always on the lookout for new patterns to use in their charity work, so I thought I best release them when they are ready.


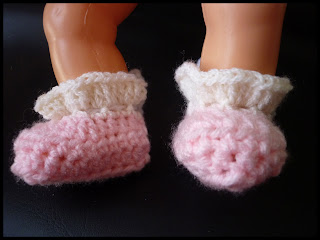
Today I have ready a new bootie pattern. It looks fantastic in any colour and completed with a slightly ruffled white cuff is great for the stronger colours too, as the white offsets it enough :)

These booties will fit a baby of 20-22 weeks gestation, and feature an open heel for ease of dressing such a small one. Ive received word back from both hospitals and funeral homes saying they really like the open heeled ones the best, so Ill stick with that for the wee ones :) I have named these the Cerys booties, pronounced (s-EH-riyz) and is a Welsh name which is derived from Carys and means "love".

These booties are done in 6 rows, and use very little yarn. Excellent stash busting pattern!


Supplies:
3mm hook
4/5ply yarn (fingering/baby/sports weight) in main colour and white for the trim.

In main colour
1. Ch11, hdc in the second chain from hook, hdc in the next 8 chains, 3hdc in the end chain, Do not turn, working on the opposite side (back side of the chains), hdc in the next 8 chains, slst to the first stitch.

2. TURN your work, ch2, hdc in each stitch around

3. Turn, ch2, hdc in each stitch around

4. Turn, ch2, hdc in the next 4 stitches, dc2tg 6 times, hdc in the last 4 stitches. End off main colour and weave in ends.

Join white with a slst to either corner

5. ch1, sc in each stitch around, turn

6. ch2, dc in the same stitch, *dc in the next stitch, 2dc in the next stitch* Repeat around until you reach the end. Finish off and weave in ends.

FOR THE TIES
chain 55. Weave the tie in and out of the stitches from row 5.

NOTE: If you want to use dk weight 8ply) yarn, you will need a 3.5mm hook, as a 3mm makes too stiff a bootie. The bootie will also be more 22-24week gestation in size.

NOTE: For a frillier top (nice for pink booties) make 2dc in each stitch around, rather then alternating 1dc, 2dc.


Pattern 3/52 for 2013
Images copyright Myshelle Cole, please do not use without permission.

Thursday, January 10, 2013

Micro Prem Ribbed Hats - Free Patterns


Hello!

Hope everyone is doing ok out there in the big wide world. I have another pattern for you guys today. Its a ribbed hat for 16/17 weeks gestation. Designed with boys in mine but could be used for either gender just fine. I find there are a lot less creative ideas for the boys so Im trying hard to think of some that are either boyish or gender neutral. This hat only has 9 rows, and is a great way to introduce yourself to fphdc!


For this hat you will need 
3mm hook
either 4 or 5 ply yarn (fingering or sports weight)
needle for sewing in ends

fphdc (front post half double crochet)

1: Ch2, hdc 8 times into the first chain, sl st to join.
2: Ch2, hdc in the same stitch, 2hdc in each remaining stitch around, join.
3: Ch2, hdc in the same stitch, *fphdc around the next stitch, 2hdc in the next stitch* repeat around, join.
4-8: Ch2, hdc, *fphdc, hdc, hdc* repeat around, join (fphdc will be done around the fphdc from the previous round, this creates the ribs)
9: Ch1, sc around, join. Finish off and weave in all ends.


NOTE: DK weight yarn (8ply) will yeild a hat to fit 18/20 weeks, however you will need to do 2 extra rows of fphdc, hdc, hdc to add length.

Pattern 2/52 for 2013
Images copyright Myshelle Cole, please do not use without permission.

Thursday, January 3, 2013

Basic Button Up Burial Cocoon- Free Pattern


Hello again and welcome to 2013!

I'm only a handful of days into this year, and it already feels better then the last :) This year, I want to aim to release one crochet pattern and one scrap kit every week (that's 52 of each for the year) so lets see how we go. Not an unrealistic goal, but something that will deff make me think!

Ok so onto the pattern :)
Today's pattern is a fully front opening cocoon that is designed to hold a baby up to 18/19 weeks gestation. Babies lost at this age are more often then not far too small and too delicate to dress, so wraps and swaddling are more appropriate. This cocoon can be used to hold bub, as a way to transport, and as a burial item. The colour combinations are endless, however I do like to trim in white or cream because it just looks nicer against the skin tone of these very early babies. You could jazz these up with interesting buttons, a few loud stripes or some appliqued shapes like small fish, hearts, stars ect. You can also close them in a few ways. Some places refer to small pouches like this as foetal demise pouches, but that just sounds crude to me, so burial cocoons it is.


Ive made these in 4, 5 and 8 ply (fingering, sport and dk weight) and there isn't really a lot of difference in it. I like using a 5ply/sport weight cotton for a nice soft and light drape.

Supplies:
Yarn in 4,5 or 8ply (fingering, sport,dk)in main and contrasting colours (a 3rd colour if doing stripes)
4mm hook
needle for sewing in ends
If using buttons, 3 matching ones for closing.

R1. Ch3, 10hdc into the 1st chain, join (with a sl st here and throughout)

R2. Ch2, hdc in the same st, *hdc, 2hdc in the next* Repeat around, join. (14)

R3: Repeat R2 (22)

R4: Ch2, hdc in each st around, join. (22)

R5: Ch2, hdc in the same st, *hdc, 2hdc in the next* Repeat around. DO NOT JOIN (working in rows here on out) (34)

R6-11, Ch2, Turn, hdc in each stitch across (34)

R12-14. Ch2, turn, hdc in the next 9 stitches, dc in the next 16 stitches, hdc in the last 9 stitches

End off main colour here. Join edging colour (white/cream)

R15-16. Ch2, turn, hdc in the next 9 stitches, dc in the next 16 stitches, hdc in the last 9 stitches

R17. ch1, turn, sc in each stitch across, do not end off, do not turn.

Working down the v split sc evenly in the ends of all stitches and back up the other side, placing 2sc in the corner before slst to the first st of R17.

End off, weave in ends.


If adding buttons: Position your buttons evenly on one side and sew on, making sure buttons are not too small to fall through stitches on opposite side, and not too large that they wont fit through the stitches snug.


If using ties: Mark of 3 places for the ties on one side of the opening, and mark the same stitches on the opposite side, join yarn with a sl st and ch21. End off and weave in ends. Make 6 ties in total, 3 on each side. Tie in a bow.


Stripes: To make the stripe pattern shown in my photo, colours were changed in 3 row groups starting at R6 (6,7,8 are green, 9,10,11 are yellow, 12, 13, 14 are green, 15, 16, 17 are yellow)

Pattern 1/52 for 2013
Images copyright Myshelle Cole, please do not use without permission.