Monday, October 29, 2012

Archie Gown - Free Crochet Pattern


Hello again lovely people! Another gown release today, this time one that is more suited for a boy (but could still be girly, or even plain neutral)

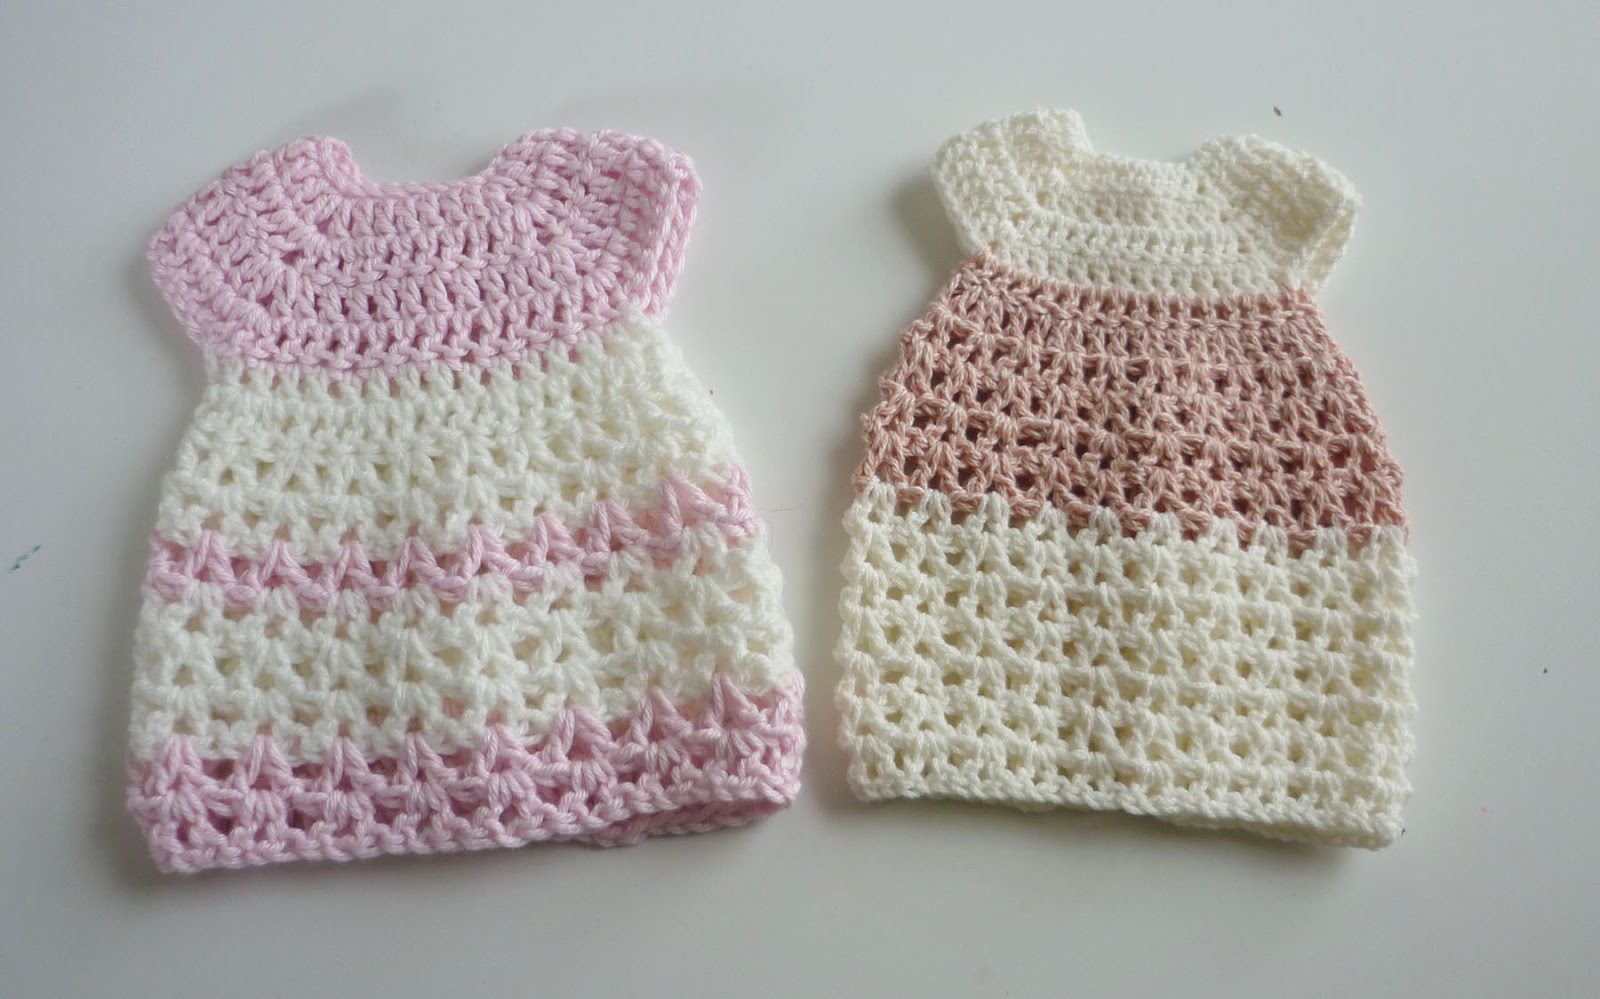
The stitch is a simple one, Im not even sure exactly what its called but it creates a beautiful effect when striped.
I named this one the Archie gown. Archie is short for Archibald, and that means Brave. Quite fitting <3

Like the Davida, it doesn't have an actual size, it depends entirely on your yarn and hook size. General rule of thumb 22-24 weeks is made using a 3mm hook and some baby 4ply fingering yarn, DK 8ly yarn and a 4mm hook and will fit around 26-28 weeks.


Archie Gown:

Row 1: Chain 32, DC in 4th chain from hook, Dc in next 2 dc, (1dc, ch, 1dc) in next chain, *dc in next 6 ch, (dc, ch, dc) in next chain. Repeat from * two MORE times. Dc in last 4 chs; ch 2 and turn.

2-4: dc in each dc, (dc, ch1, dc) in each ch1 space from the previous round, ch2, turn

5: Sleeve Row: dc in each st to the first ch1 space, skip all stitches and dc in the next ch1 space. One sleeve made. Repeat to create the second sleeve, dc to the end, ch2, turn.

6: ch3, *dc in the next 3 stitches, 2dc in the next stitch* Repeat across, turn

7 and all remaining rows until desired length: ch1, *sk 1, (sc, dc) in the next stitch together* Repeat across, turn

This creates a sloped small cluster type stitch throughout the gown.
You can change colours whenever you like, and as always, Ill be adding my own to the ravelry page so be sure to check there for ideas on colours and feel free to add your own projects :D

Sunday, October 21, 2012

Simple Sandals - Free Crochet Pattern


There is only one thing cuter then little baby feet, and that's little baby feet in little baby shoes! Its coming on to warmer weather now here in Aus, and so I thought it would be a great time to work on some baby shoes that are for the warmer weather.

Todays shoes are the Simple Sandal, and when I say simple, boy do I mean simple! They use hardly any yarn and can be whipped up in no time flat, and as a bonus they can be made equally as cute in boy and girl colours!

Simple Sandals: Newborn Size (0-3)
4mm hook
dk (8ply) weight yarn in main and contrasting colours
2 buttons
small needle for sewing on buttons and weaving in ends.

Making the sole: Contrasting colour

1: Chain 10, hdc in the 3rd chain from hook 4 times, hdc in the next 2 chains, dc in the next 4 chains, 6dc in the last chain, DO NOT TURN, working on the opposite side, dc 4 times, hdc twice, join to first hdc, then sl st to the next stitch so the yarn is close to the centre of the heel.

2: ch1, sc twice in the same stitch as the ch, 2sc in the next stitch, sc in the next 10 stitches, 2sc in the next 2 stitches, sc in the next 10 stitches, join to the first sc, then sl st to the next to centre yarn.

3: ch1, 2sc in the same st as the ch, 2sc in the next stitch, sc in the next 9 stitches, 2sc in the next st four times, sc in the next 9 stitches, 2sc in the last 2 stitches, join. End of, do not weave in ends (you will need it as a marker)


LEFT BOOTIE: Main Colour
Count 12 stitches on each side of where you ended off and place markers.

1: With toe pointing towards you, join yarn in the back loop of the marker to the left, ch1, sc in each stitch around, back loops only, join.

2: ch2, hdc in each stitch until you reach the second marker, ch2, TURN

3: hdc in each hdc around, ch2, turn

4: hdc in the next 3 stitches, ch2, turn

5-8: hdc in 3 stitches, ch2, turn

End off and weave in ends.

RIGHT BOOTIE: Main Colour
Count 12 stitches on each side of where you ended off and place markers.

1: With toe pointing towards you, join yarn in the back loop of the marker to the right, ch1, sc in each stitch around, back loops only, join.

2: ch2,turn, hdc in each stitch until you reach the second marker, ch2, TURN

3: hdc in each hdc around, ch2, turn

4: hdc in the next 3 stitches, ch2, turn

5-8: hdc in 3 stitches, ch2, turn

End off and weave in ends.

Join contrasting colour on the corner that will be covered by the strap (makes for a neater finish) and slip stitch around the entire bootie. End off and weave in ends. Sew on buttons, done!


Thursday, October 18, 2012

Davida Gown - Free Crochet Pattern


Hello again lovlies!

I am so very sorry its been a while since my last pattern, I've been super busy making items for some new charities, and finishing up some classes I've been taking. Its all quite exciting.

Today I have a little gown for you, which I've called the Davida gown, which is Hebrew for "Beloved" Very fitting <3


This gown doesn't have any particular "size" It depends entirely on what yarn and hook size you use. In the image you can see 2 gowns, one smaller then the other. The smaller one will fit about 22-24 weeks, and is made using a 3mm hook and some baby 4ply fingering yarn. The larger uses DK 8ly yarn and a 4mm hook and will fit around 26-28 weeks. Play with the sizes and the hooks and see what you come up with.

Ill be sure to add project notes to the Ravelry page as I add more as well, so you can always check there to get more ideas.
I have also not made a note of the colour changes, as this can be varied for each gown, or you may like to just keep it all in one colour. The gown itself is very simple and once you get into the rhythm it is a breeze to make.


For closing options, you can choose buttons, ties on the back or even a ribbon threaded right through the bodice and tied at the back.

Instructions in (brackets) are to be completed in the SAME stitch.

Davida Gown:

Row 1: Chain 32, DC in 4th chain from hook,  Dc in next 2 dc, (1dc, ch, 1dc) in next chain, *dc in next 6 ch, (dc, ch, dc) in next chain.  Repeat from * two MORE times.  Dc in last 4 chs; ch 2 and turn.

2-4: dc in each dc, (dc, ch1, dc) in each ch1 space from the previous round, ch2, turn

5: Sleeve Row: dc in each st to the first ch1 space, skip all stitches and dc in the next ch1 space. One sleeve made. Repeat to create the second sleeve, dc to the end, ch2, turn.

6: *dc, dc, 2dc in the next* Repeat to end, ch2, turn.

7: ch1, *sk1, (dc, ch, dc) in the next*, v stitch made. Repeat to end, dc in last, ch2, turn.

8 and all rows until desired length reached: dc, v stitch in the ch1 space of each v stitch from previous row across, dc in the last st, ch2, turn.

Finish off and weave in all tails. Add a button or ties to the back to close.


Davida Gown - Dutch


DUTCH TRANSLATION - met dank aan Karin


Wol:
Scheepjes Colour Crafter met haaknaald 3 of 3.5 of Soft van Zeeman met haaknaald 2.5 of 3 in zachte kleurtjes Je kunt dit jurkje ook met verschillende kleuren haken zoals je boven op de foto ziet of in 1 kleur.

Of haakkatoen geschikt voor haaknaald 2 dan wordt het een stuk kleiner maar die maatjes zijn soms ook nodig.

Rij 1: Haak 32 lossen, haak 1 stokje in de 4e losse vanaf haaknaald, 1 stokje in de volgende 2 stokjes, (1 stokje, 1 losse, 1 stokje) in de volgende losse, *1 stokje in de volgende 6 lossen, (1 stokje, 1 losse, 1 stokje) in de volgende losse* Herhaal tussen*-* nog 2x. Haak 1 stokje in de laatste 4 lossen, haak 2 lossen en keer je werk.

Rij 2-4: 1 stokje in elk stokje, (1 stokje, 1 losse, 1 stokje) in elke losse ruimte van de vorige rij, haak 2 lossen en keer je werk.

Rij 5: je start hier voor de mouwen: 1 stokje in elke steek tot je bij de 1e losse ruimte komt, sla alle steken over en maak 1 stokje in de 2e losse ruimte. Je hebt nu 1 mouw gemaakt. Haak weer 1 stokje in elke steek tot je bij de volgende losse ruimte komt, sla weer alle steken over en haak 1 stokje in de laatste losse ruimte en in de overige steken van de toer. Haak 2 lossen en keer je werk.

Rij 6: *1 stokje in de volgende 2 stokjes, 2 stokjes in de volgende steek*, herhaal *-* tot het einde van de rij. Haak 2 lossen en keer je werk.

Rij 7: *sla 1 steek over, (1 stokje, 1 losse, 1 stokje) in de volgende steek*, de steek tussen *-* noemen we nu de v-steek.

Herhaal *-* tot het einde van de rij, haak 1 stokje in de laatste steek van de rij, haak 2 lossen en keer je werk.

Rij 8: en alle overige rijen tot je de gewenste lengte van het jurkje hebt bereikt.

1 stokje in 1e steek, v-steek in elke 1 losse ruimte van elke v-steek van de vorige rij, 1 stokje in de laatste steek van de rij, haak 2 lossen en keer je werk.

Om het jurkje te sluiten heb je verschillende opties. Je kunt een lintje door het jurkje rijgen dat met een strikje op de rug sluit. Je kunt ook een paar kleine knoopjes op de achterkant naaien. Het jurkje is zowel met de knoopjes achter als voor te dragen.


Tuesday, October 9, 2012

Little Dinosaur Motif - Free Crochet Pattern


 Ive had this motif done for some time now (some time.. moooooonths lol) and forgot to submit it! It was originally intended for a hooded bunting that never worked out, so here is the dinosaur now, maybe in the future Ill get the bunting sorted too!  I need to get some better images but I wanted to get this up for a friend, so Ill update it with new piccies later <3

Using a 3.5mm hook and 5ply (sports weight) yarn

ch5, hdc in 2nd ch from hook, hdc in the next 3 st, 4hdc in the last st, (do not turn, continue around)
hdc in the next 3 sts, 1hdc in first st. sl st to join. (this creates the body)

ch6 sc in 1st from hook and each ch along to end, sc in same st the chains started on (this creates the tail, continue working around the body), ch3, sc in same st as last sc, sl, sl, sc, ch3, sc same as sc, (feet completed) sl, sl, ch9, 2hdc 2nd hook, 2dc next, 1hdc, sl, 4sc, rings back to main body, skip 1 st, sl to next, sl to start of tail. Finish off and weave in ends.

Eye can be a small button, fabric paint or stitched with yarn or embroidery thread.

Monday, October 1, 2012

Basic 20w folded brim hat


Hey howdy hey peeps!

This is the first in a series of basic hat designs for preemies (Ill have other sizes out throughout the coming weeks). I know that the fancier ones are lovely to look at, but this is a starting point to many who are new and need help, particularly with sizing. This hat is super easy, super fast and super cute. These ones are to fit 20 weeks gestation.


You will need:
4 or 5 ply yarn (baby/sports weight, either works fine)
3.5mm hook
small button or embellishment
needles for weaving ends and sewing on button

1. ch2, hdc 8 times in the first chain, join.
2. ch3. dc in the same stitch, 2dc in each remaining stitch around, join.
3. ch3, dc in the same stitch, *2dc in the next stitch, dc in the next* Repeat around, join.
4 - 8 ch3, dc in each stitch around, join.
9. ch2, hdc in each st around, join.

Weave off ends. Fold up the brim so the last dc row and hdc row are turned. Sew on a button (be sure to sew through only one later, not both, so the brim length can be adjusted if need be when used.)

Thats it, a hat in 9 rows. I got 4 hats from a 25g ball of VillaWool superwash 5ply so they use very little yarn.


DUTCH TRANSLATION - met dank aan Karin

Wol:
Scheepjes Colour Crafter met haaknaald 3 of 3.5 of Soft van Zeeman met haaknaald 2.5 of 3 in zachte kleurtjes Of haakkatoen geschikt voor haaknaald 2 dan wordt het een stuk kleiner maar die maatjes zijn soms ook nodig.

Rij 1:
Haak 2 lossen (of haak een magische ring met 8 halve stokjes) haak 8 halve stokjes in 1e losse, sluit met halve vaste.

Rij 2:
Haak 3 lossen, haak 1 stokje in dezelfde steek, 2 stokjes in elke overige steek, sluit met halve vaste

Rij 3:
Haak 3 lossen, haak 1 stokje in dezelfde steek, *2 stokjes in de volgende steek, 1 stokje in de volgende steek*, herhaal tussen *-* tot het einde, sluit met halve vaste.

Rij 4-8:
Haak 3 lossen, haak in elke steek 1 stokje, sluit met halve vaste.

Rij 9:

Haak 2 lossen, haak 1 half stokje in elke steek, sluit met halve vaste. Hecht draad af en werk draadjes weg.

Vouw de laatste rij om. Naai eventueel een knoopje (door de omgeslagen rand zodat het mutsje nog kleiner gemaakt kan worden.